How the Kubernetes Scheduler Actually Chooses a Node
Discover how the Kubernetes scheduler makes placement decisions. Learn how kube-scheduler evaluates pods through filtering, scoring, preemption, and binding when standard node selection occurs.
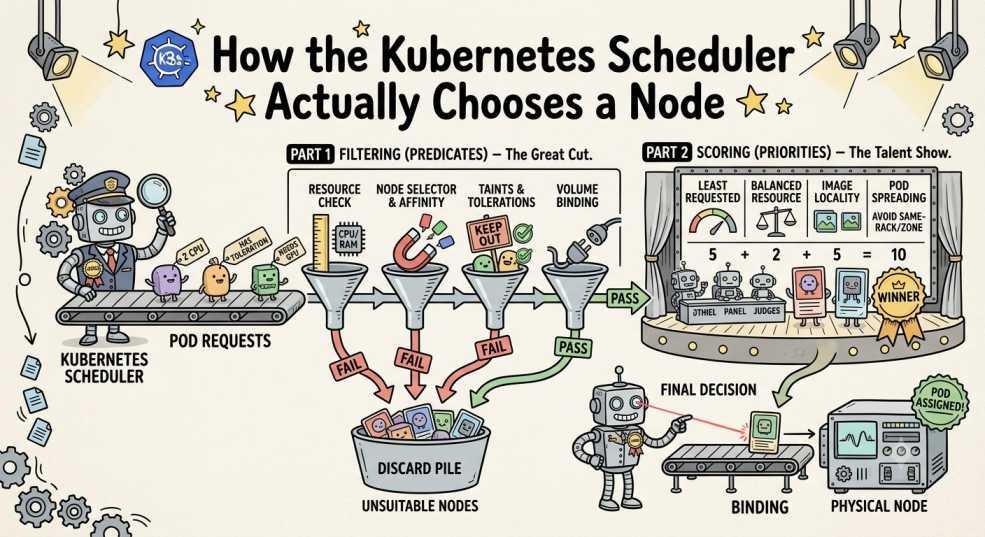
You apply a deployment manifest, run kubectl get pods, and see this output:
NAME       READY   STATUS    RESTARTS   AGE
api-pod    0/1     Pending   0          2m
Your cluster has 20 nodes with gigabytes of memory and dozens of CPU cores available. Why is Kubernetes refusing to run your pod? And when it finally selects a node, how does it choose worker-04 over worker-12?
The selection process is not random, nor does Kubernetes simply pick whichever node has the lowest current CPU usage. Instead, kube-scheduler runs every unscheduled pod through a strict placement engine.
To debug pending pods or design resilient clusters, you need to understand the exact decision-making process the scheduler uses to evaluate your infrastructure.
What the Scheduler Does (and What It Delegates)
Before looking at the algorithm, it is essential to understand where the scheduler's responsibilities start and stop.
The job of kube-scheduler is limited to a single decision: assigning an unscheduled pod to a specific node.
               [ API Server ]
                     │
                     ▼
           [ kube-scheduler ]
   (Decides: Pod api-pod -> Node worker-04)
                     │
                     ▼
            [ API Server (Etcd) ]
                     │
                     ▼
           [ Kubelet on worker-04 ]
      (Pulls image, sets up network, runs container)
The scheduler does not:
- Pull container images from repositories
- Allocate CNI network interfaces or IP addresses
- Mount persistent storage volumes
- Execute runtime processes
Once kube-scheduler writes the selected node name into the pod's spec.nodeName field via the API Server, its job is finished. The Kubelet running on that target node detects the assignment and takes over execution.
The Complete Scheduling Lifecycle
When a pod enters the control plane, it moves through a structured pipeline split into two main phases: the Scheduling Cycle (which selects the node) and the Binding Cycle (which executes the assignment).
                   New Pod
                      │
                      ▼
              Scheduling Queue
                      │
                      ▼
               FILTERING (Phase 1)
                      │
         ┌────────────┼────────────┐
         │                         │
     Node 01 ❌                Node 02 ✅
     Node 03 ❌                Node 04 ✅
     Node 05 ❌                Node 06 ✅
         │                         │
         └────────────┬────────────┘
                      ▼
               SCORING (Phase 2)
                      │
         ┌────────────┼────────────┐
         ▼            ▼            ▼
      Node 02      Node 04      Node 06
      (Score: 65)  (Score: 92)  (Score: 78)
                      │
                      ▼
              Selected: Node 04
                      │
                      ▼
                BINDING (Phase 3)
                      │
                      ▼
             Kubelet Takes Over
1. The Scheduling Queue
When the API Server accepts a pod without a nodeName, kube-scheduler places it into an internal memory queue.
The scheduler manages three distinct queue structures:
- Active Queue (
activeQ): Pods waiting for an immediate scheduling attempt. - Backoff Queue (
podBackoffQ): Pods that failed previous scheduling attempts and are waiting out a backoff timer before retrying. - Unschedulable List (
unschedulablePods): Pods that cannot be placed due to missing cluster requirements (for example, missing persistent volumes or unsatisfied node selectors).
When cluster events occur (such as a new node joining or a pod terminating), the scheduler moves relevant pods from the unschedulable list back into the active queue.
2. Filtering: Eliminating Ineligible Nodes
In a cluster with hundreds of nodes, scoring every worker for every pod would be inefficient. The scheduler first runs a Filtering phase (historically called Predicates) to eliminate nodes that cannot run the pod.
The scheduler evaluates candidate nodes against hard constraints. If a node fails even one filter plugin, it is immediately discarded.
Starting Pool: 10 Worker Nodes
   │
   ├── Node 01: Fails CPU resource check ❌
   ├── Node 02: Passes all checks ✅
   ├── Node 03: Taint not tolerated ❌
   ├── Node 04: Passes all checks ✅
   ├── Node 05: NodeSelector mismatch ❌
   ├── Node 06: Passes all checks ✅
   └── Node 07-10: Insufficient memory ❌

Eligible Candidates: [ Node 02, Node 04, Node 06 ]
Key Filtering Plugins
Resource Requirements
resources:
  requests:
    cpu: "2"
    memory: "4Gi"
The scheduler checks if a node's allocatable resources minus its currently requested resources can accommodate the pod's requests. If a node has 80% actual CPU free but 95% of its CPU has already been reserved by existing pod requests, the node is filtered out.
Node Selectors and Required Affinity
nodeSelector:
  environment: production
If a pod specifies a node selector or requiredDuringSchedulingIgnoredDuringExecution node affinity, any node lacking those exact labels is eliminated.
Taints and Tolerations
Nodes can carry taints to repel pods. A pod will be filtered out unless it carries a matching toleration:
Node worker-01 (Taint: workload=gpu:NoSchedule)

Pod A (No toleration)       ──> Filtered Out ❌
Pod B (Matching toleration) ──> Eligible ✅
Common Misconception: Adding a toleration to a pod does not force Kubernetes to place the pod on that tainted node. A toleration simply tells the scheduler: "This pod is allowed to run on this node if chosen."
Topology Spread Constraints
Topology constraints distribute pods across failure domains (like availability zones or rack IDs). If placing a pod on Node 02 would violate max-skew limits across zones, Node 02 is filtered out.
3. Scoring: Ranking the Surviving Candidates
Once filtering finishes, the scheduler is left with a pool of feasible nodes. Next comes the Scoring phase (historically called Priorities), where candidate nodes are ranked to determine the best fit.
Each enabled scoring plugin evaluates the remaining nodes and assigns them a score (typically from 0 to 100). The scheduler multiplies each plugin's score by its configured plugin weight, sums the totals, and selects the node with the highest aggregate score.
Scoring Plugin                     Node 02     Node 04     Node 06
------------------------------------------------------------------
NodeResourcesBalancedAllocation      80          90          70
ImageLocality                        0           100         0
NodeAffinity (Preferred)             100         50          100
------------------------------------------------------------------
Final Weighted Score                 72          91          64
                                                  ▲
                                           Selected Winner
Key Scoring Plugins
- NodeResourcesBalancedAllocation: Favors nodes that maintain a balanced ratio of CPU and memory usage.
- ImageLocality: Awards higher scores to nodes that have already pulled the required container images, reducing pod startup latency.
- Preferred Node Affinity (
preferredDuringSchedulingIgnoredDuringExecution): Gives extra points to nodes that match soft placement preferences.
Required vs Preferred Rules
Understanding the architectural distinction between required and preferred rules clarifies how configuration choices impact scheduler performance:
Pod Specification Rule
       │
       ├── Required (Hard Constraint)  ──> Evaluated in FILTERING phase (Pass/Fail)
       │
       └── Preferred (Soft Preference) ──> Evaluated in SCORING phase (Gradient Score)
If a required rule cannot be satisfied, your pod remains in Pending. If a preferred rule cannot be satisfied, Kubernetes ignores it and schedules the pod on the next best node.
How Rules Mapping Works in the Pipeline
| Feature | Primary Purpose | Pipeline Effect |
| Resource Requests | Ensure capacity availability | Filtering (Hard limit) |
| Node Selector | Restrict placement to labeled nodes | Filtering (Hard limit) |
| Required Affinity | Mandatory node or zone requirements | Filtering (Hard limit) |
| Preferred Affinity | Express placement preferences | Scoring (Weight boost) |
| Taints & Tolerations | Reserve nodes for specific workloads | Filtering (Hard limit) |
| Pod Anti-Affinity | Prevent co-location of replicas | Filtering or Scoring |
| Topology Spread | Balance workloads across failure domains | Filtering and Scoring |
What Happens When Every Node Fails?
When all nodes are filtered out during scheduling, the pod stays in the Pending state. The scheduler emits a system event detailing why each node failed.
You can view these reasons using kubectl describe:
kubectl describe pod api-pod
Events:
  Type     Reason            Age   From              Message
  ----     ------            ----  ----              -------
  Warning  FailedScheduling  45s   default-scheduler 0/12 nodes are available: 4 Insufficient cpu, 3 node(s) had untolerated taint, 5 node(s) didn't match PodFields region=us-east-1.
Preemption and Priority Classes
If a high-priority pod arrives and no nodes pass filtering, the scheduler can trigger Preemption.
Node worker-02 (Fully Allocated)
 ├── Low-Priority Pod A (CPU: 1)  ──> EVICTED ❌
 ├── Low-Priority Pod B (CPU: 1)  ──> EVICTED ❌
 └── System Pod C       (CPU: 2)

        ▼ (Space Freed)

 High-Priority Pod (CPU: 2)       ──> SCHEDULED ✅
The scheduler identifies nodes where evicting lower-priority pods will free enough resources to satisfy the incoming high-priority workload. It sends graceful termination signals to those lower-priority pods, waits for them to exit, and then assigns the node to the incoming pod.
4. Binding: Committing the Assignment
Once the winner is chosen, the scheduler enters the Binding Cycle:
- Reserve: The scheduler tentatively reserves resources in local memory so concurrent scheduling cycles do not overcommit the target node.
- Permit: Optional plugins can hold or delay pod binding (for example, waiting for external storage volumes to attach).
- Pre-Bind & Bind: The scheduler issues an HTTP API request updating the Pod object's
spec.nodeNamefield inetcd.
Once written to etcd, the scheduler steps aside. The Kubelet on the selected worker node notices the change via its API Server watch loop and initiates local container execution.
A Real Cluster Decision Trace
Consider an example workload and cluster state:
# Workload Specification
apiVersion: v1
kind: Pod
metadata:
  name: payment-processor
spec:
  containers:
  - name: app
    image: payment-api:v2
    resources:
      requests:
        cpu: "4"
        memory: "8Gi"
  nodeSelector:
    tier: compute
  tolerations:
  - key: "dedicated"
    operator: "Equal"
    value: "payments"
    effect: "NoSchedule"
Cluster State Evaluation
Node 01: [4 CPU free, 16Gi free] [tier=compute]
  └── Result: FILTERED OUT (Needs 4 CPU, but remaining allocatable headroom < 4 CPU due to system reserves)

Node 02: [8 CPU free, 16Gi free] [tier=general]
  └── Result: FILTERED OUT (Fails nodeSelector tier=compute)

Node 03: [8 CPU free, 16Gi free] [tier=compute] [Taint: dedicated=payments:NoSchedule]
  └── Result: PASSED FILTERING (Toleration matches) | Score: 78

Node 04: [16 CPU free, 32Gi free] [tier=compute] [No Taints]
  └── Result: PASSED FILTERING | Score: 92 (Higher score due to resource balance and cached image)

Winner: Node 04 is bound to payment-processor.
Practical Debugging Checklist
When investigating why a pod is stuck in Pending or running on an unexpected node, follow this sequence:
Verify Labels and Taints:
kubectl get nodes --show-labels
kubectl get nodes -o custom-columns=NAME:.metadata.name,TAINTS:.spec.taints
Ensure spelling and key-value pairs match your manifest selectors and tolerations exactly.
Compare Resource Allocations:
kubectl describe node <node-name>
Inspect Allocatable capacity versus Non-terminated Pods resource requests. Remember that scheduling is based on requests, not actual real-time utilization.
Check Pod Events:
kubectl describe pod <pod-name>
Look at the Events section at the bottom for exact filter counts.
Summary Pipeline
             Unscheduled Pod
                    │
                    ▼
            Scheduling Queue
                    │
                    ▼
            FILTERING PHASE
        "Which nodes CAN run this?"
                    │
                    ▼
             SCORING PHASE
       "Which node SHOULD run this?"
                    │
                    ▼
              BINDING PHASE
     "Write spec.nodeName to API Server"
                    │
                    ▼
           Kubelet Handles Runtime
The Kubernetes scheduler is a deterministic placement engine. It filters out candidate nodes using hard requirements, ranks eligible workers using weighted scoring rules, and delegates container management to the node Kubelet once the placement decision is bound.
The Takeaway: Scheduling as an Architecture Strategy
The Kubernetes scheduler is not guessing, and it is not simply looking for an empty server. It is solving a multi-constraint placement problem every time a pod is created.
When you recognize that every Pending pod is simply a failed filtering check and every unexpected node selection is the result of weighted scoring calculations, troubleshooting cluster behavior becomes a structured process rather than a guessing game.
By writing precise resource requests, using taints and tolerations deliberately, and establishing topology spread constraints, you move from fighting kube-scheduler to letting it manage your workload topology automatically.
Once the scheduler writes spec.nodeName to etcd, its responsibility ends. From there, the local node takes over to bring your application to life.