Enhancing Container Security with DevOps Best Practices
Learn how to enhance container security using DevSecOps best practices. From SBOMs and image signing to Kubernetes Pod Security Standards and eBPF runtime monitoring, discover a complete lifecycle checklist to protect your containerized workloads.
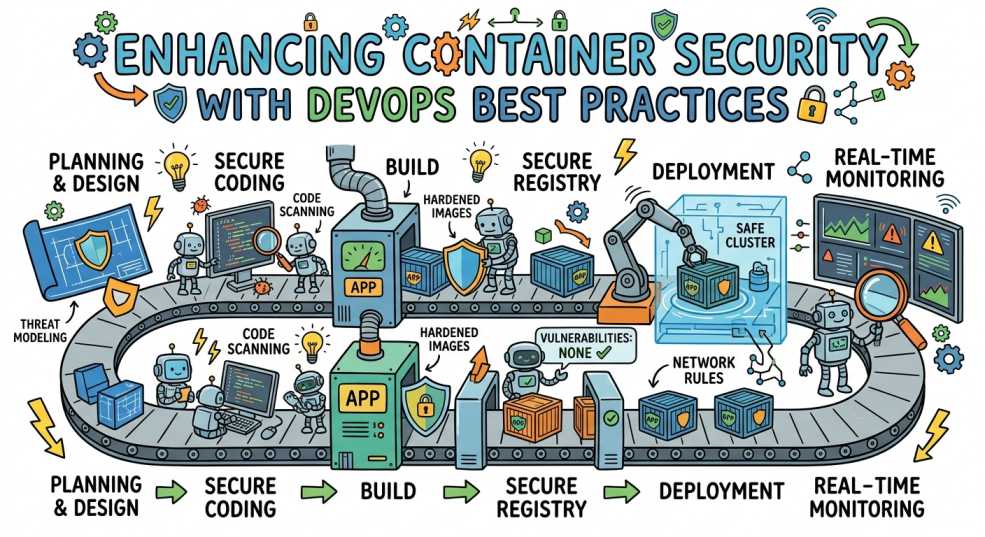
Hey there, tech-savvy pals! 🌟 Are you ready to dive into the wild world of container security? We're talking about containers, not the ones that hold your grandma's secret lasagna recipe (though those are pretty important too). Today, we're exploring how to enhance your container security using DevOps best practices. So buckle up, because this is going to be a thrilling ride through the cyber-ocean!
Container Security: Why It Matters
First off, let’s tackle the elephant in the room: Why should you even care about container security? Well, imagine you’re at a fancy dinner party. You wouldn’t leave the doors wide open while the appetizers are on the table, right? That’s what container security is all about: keeping your digital goodies safe from unwanted guests!
Here are some reasons why container security deserves a front-row seat:
Protection Against Threats: Containers can be vulnerable to attacks, just like bad actors trying to sneak into a VIP party to steal the spotlight.
Compliance: Many industries have regulations that require strict security measures. Think of it as wearing pants in public: mandatory!
Maintaining Trust: Customers want their data safe. A breach can lead to loss of trust, and we all know that a good reputation is harder to rebuild than an IKEA bookshelf without instructions.
Reducing the Blast Radius: Containers provide isolation, but isolation alone is not complete security. A compromised container can still become a starting point for privilege escalation, credential theft, or lateral movement if the surrounding environment is not properly secured.
That’s why container security needs to cover the entire lifecycle, from the image you build to the workload running inside your cluster.
Best Practices for Securing Your Containers
Now that we've established that container security is the unsung hero of the tech world, let's dive into some best practices that can help you fortify your fortress.
1. Image Scanning & Supply Chain Protection: The Detective Work
Doing a little snooping on your container images is essential. Just like Sherlock Holmes wouldn't trust Watson's intuition without a good investigation, you shouldn't trust your images without scanning and verifying them.
Scan for Vulnerabilities & Generate SBOMs: Use tools like Trivy or Grype to hunt down vulnerabilities and generate a Software Bill of Materials (SBOM) for your images before deploying them.
An SBOM gives you a clear picture of what actually exists inside your image. This becomes especially useful when a new vulnerability is discovered, and you suddenly need to answer the classic question: "Are we using that vulnerable package anywhere?"
Sign and Verify Images: Cryptographically sign your container images using tools like Cosign from Sigstore so you know the image you are deploying is the image that was actually produced and approved by your pipeline.
Signing alone isn't enough. The signature should also be verified before an image is allowed into production.
Limit Base Images: Choose minimal or distroless base images. The fewer packages installed, the fewer vulnerabilities and unnecessary components you have to worry about. It’s like going on a diet: less is sometimes more!
Pin Images by Digest: Avoid relying only on mutable tags such as latest. Pin production workloads to immutable image digests where practical so you know exactly which image artifact is being deployed.
Verify Build Provenance: Knowing what is inside an image is useful. Knowing where the image came from is even better. Build provenance and attestations can help establish which source and build process produced an artifact.
2. Access Management & Admission Control: The VIP Guest List
If you wouldn’t let strangers waltz into your living room, then don’t let just anyone have access to your containers!
Role-Based Access Control (RBAC) & Non-Root Execution: Assign specific permissions based on roles, and avoid running containers as root unless there is a legitimate reason. It’s like giving your friends a key to your house but making sure they can't redecorate the master bedroom.
Running as a non-root user is only one part of the picture. You should also review Linux capabilities, privilege escalation settings, host namespace access, and filesystem permissions.
Use Workload Identity & Secrets Management: Keep sensitive information safe with secret management tools, such as HashiCorp Vault or External Secrets Operator, and cloud workload identities instead of hardcoded API keys. Don’t write passwords down and stick them on your monitor like a toddler’s homework assignment!
Also remember that putting a secret into a Kubernetes manifest does not automatically make it secure. Access to the secret, how it is stored, who can read it, and how it reaches the workload all matter.
Enforce Pod Security Standards: Kubernetes provides built-in Pod Security Admission with the Privileged, Baseline, and Restricted security profiles. Baseline prevents known privilege escalations, while Restricted follows current Pod hardening best practices.
Enforce Policy Controls: You can also use Kubernetes admission policy tools like Kyverno or OPA Gatekeeper to automatically block non-compliant, insecure containers from launching in your cluster.
For example, you can enforce rules such as:
- Containers must not run as root.
- Privileged containers are not allowed.
- Only approved registries can be used.
- Images must be signed.
- Host networking must not be enabled unless explicitly approved.
This moves security from a document developers are expected to remember into an actual control enforced by the platform.
3. Runtime Security: The Bouncer at the Door
Imagine you’re at a club where the bouncer checks IDs and monitors the dance floor. That’s basically what runtime security does for your containers. 🕴️
Monitor Activity with eBPF: Keep an eye on container behavior at the kernel level using eBPF-powered tools like Falco or Tetragon. Unusual system call activity might be a sign of an unauthorized breach, like someone trying to sneak in without covering their fake mustache.
Passing every security check during the build does not mean a workload will behave safely after deployment. A clean image can still be compromised through an application vulnerability, stolen credentials, or a misconfigured dependency.
Implement Container Security Policies: Set up security profiles such as AppArmor and Seccomp that dictate how your containers should behave, just like strict house rules at a wild party.
Seccomp can restrict the system calls a container is allowed to make, while AppArmor can restrict what a process is allowed to access. Combined with least privilege, these controls can reduce the potential impact of a compromised workload.
Monitor Unexpected Behavior: Pay attention to unexpected shell execution, access to sensitive files, unusual network connections, privilege changes, or processes that normally never appear inside a workload.
The goal is not simply to know that a container is running. Runtime security should help you identify when a container starts doing something it shouldn't.
4. Network Security: Fortify Your Perimeter
Think of your containerization setup like a castle surrounded by a moat. You want to ensure that only the right traffic gets in!
Segment Your Network: Divide your network into segments using Kubernetes NetworkPolicies or eBPF networking like Cilium. It’s like having different rooms at your party: VIP Lounge, Regular Zone, and the Bathroom (no one wants a breach there!).
Avoid treating every Pod inside the cluster as automatically trustworthy. A compromised application should not automatically be able to communicate with every other workload.
Start with clearly defined ingress and egress requirements and restrict traffic to only what is actually required.
Enforce Mutual TLS (mTLS): Use a service mesh or another appropriate encryption mechanism to secure container-to-container communication where mTLS is required. Think of it as a solid bouncer that ensures every conversation in the room is strictly private.
mTLS can provide workload identity and encryption between services, but it should be introduced based on the actual communication and security requirements of the platform rather than simply enabling it everywhere.
Control Egress Traffic: Don't only focus on traffic coming into the cluster. If a compromised container can freely connect to the internet or internal services, an attacker may use it for command-and-control communication or lateral movement.
Controlling outbound traffic can therefore become an important part of your container security strategy.
5. Regular Updates & DevSecOps Automation: Staying Ahead of the Game
Just like you wouldn’t wear last season’s fashion, you shouldn’t be running outdated software. Keeping your containers and their dependencies up-to-date is crucial.
Automate Updates via CI/CD: Use your CI/CD pipelines to automate image rebuilds, dependency patching, and vulnerability checks. Make it as effortless as walking into your kitchen to grab a snack!
A good pipeline should ideally identify security issues before an insecure image reaches production instead of discovering the problem after deployment.
A typical workflow could look something like this:
Code → Build → SBOM → Vulnerability Scan → Sign → Verify → Deploy
Continuous Vulnerability Monitoring: Stay informed about newly discovered vulnerabilities in your running container images through continuous scanner feeds.
A container that was considered safe yesterday may contain a vulnerable dependency tomorrow. Security cannot end once the image successfully passes the CI pipeline.
Automate Image Rebuilds: When a base image or dependency receives a security update, automatically rebuild affected images where possible. This is particularly useful for applications that rely on common base images and shared dependencies.
6. Secure the Kubernetes Configuration: Don't Forget the Cluster
Container security is not only about the container.
You can have a perfectly scanned and signed image running inside a badly configured Kubernetes cluster and still have a security problem.
Review your Kubernetes configuration regularly, including:
- RBAC permissions
- Service accounts
- NetworkPolicies
- Pod Security Standards
- Secrets access
- Admission policies
- Node security
- API server access
- Container capabilities
- Host namespace usage
- Privileged workloads
For example, a workload may use a secure image but still request:
securityContext: privileged: true
At that point, your beautifully scanned image is not going to save you from a bad runtime configuration.
Security has to follow the workload all the way into the cluster.
7. Don't Forget the Nodes: Container Security Starts Below the Container
Containers share the underlying kernel with the host. That means the security of the container environment also depends on the security of the nodes running those containers.
Keep your node operating systems and container runtimes patched and monitored.
Avoid unnecessary host access and be especially careful with workloads that use:
hostNetworkhostPIDhostIPC- HostPath volumes
- Privileged containers
- Excessive Linux capabilities
These configurations can be legitimate for certain infrastructure workloads, but they should not become the default for normal applications.
The more access a container has to the underlying node, the more damaging a compromise can potentially become.
8. Make Security Part of the Developer Workflow
Security becomes much easier when developers don't have to wait until production to discover that their container has a problem.
Bring security checks closer to the developer:
Developer → Pull Request → Image Build → Scan → Policy Check → Sign → Deploy
Give developers useful feedback instead of simply throwing a giant vulnerability report at them.
For example:
"Your image contains a critical vulnerability in package X."
is much more useful when accompanied by:
"Update package X from version A to version B."
The goal of DevSecOps isn't to create another department that blocks deployments. The goal is to make secure deployments the easiest deployments to create.
Container Security in Production: A Simple Checklist
Before you deploy a container to production, ask:
- Is the image scanned?
- Do we know what's inside the image?
- Do we have an SBOM?
- Is the image signed?
- Are signatures verified before deployment?
- Is the image pinned to a known digest?
- Is the container running as a non-root user?
- Are unnecessary Linux capabilities removed?
- Is privilege escalation disabled where possible?
- Are Seccomp and AppArmor being used where appropriate?
- Is the workload covered by Pod Security Standards or another admission policy?
- Are Kubernetes RBAC permissions restricted?
- Are secrets managed properly?
- Are NetworkPolicies configured?
- Is unnecessary egress restricted?
- Is runtime behavior being monitored?
- Are the underlying nodes and container runtime patched?
- Do we continuously monitor vulnerabilities after deployment?
If you answered "yes" to most of these, you're already in a much better position than teams that simply scan an image and call it a day.
Scanning Container Images: The Actual Commands
Every guide says "scan your images". Far fewer show what that looks like in a pipeline that has to fail correctly. These are the three scanners you will realistically meet.
# Trivy - fail the build on HIGH or CRITICAL, ignore the rest
trivy image --severity HIGH,CRITICAL --exit-code 1 myapp:1.4.2

# Ignore unfixed CVEs so you do not block on things you cannot action
trivy image --severity HIGH,CRITICAL --ignore-unfixed --exit-code 1 myapp:1.4.2

# Grype
grype myapp:1.4.2 --fail-on high
The part most teams miss: generate an SBOM at build time. A new CVE published next month affects an image you already shipped, and without an SBOM your only option is rebuilding everything to find out whether you are exposed.
# Produce an SBOM once, at build time
syft myapp:1.4.2 -o spdx-json > sbom.json

# Weeks later, re-check that SBOM against today's CVE feed - no rebuild needed
grype sbom:./sbom.json
Which scanner to use
| Tool | Scans | SBOM | Best for |
|---|---|---|---|
| Trivy | Images, filesystems, IaC, live clusters | Yes | General purpose; sensible CI default |
| Grype | Images and SBOMs | Via Syft | SBOM-first workflows, re-scanning without rebuilds |
| Docker Scout | Images | Yes | Teams already inside the Docker ecosystem |
Scanner choice matters less than where the gate sits. A scan that reports but never blocks is a dashboard, not a control.
Putting the Gate in CI
A scan that only runs nightly tells you what you already shipped. Put it on the pull request, where it is cheap to act on.
- name: Build image
  run: docker build -t myapp:${{ github.sha }} .

- name: Scan and fail on HIGH/CRITICAL
  uses: aquasecurity/trivy-action@master
  with:
    image-ref: myapp:${{ github.sha }}
    severity: HIGH,CRITICAL
    ignore-unfixed: true
    exit-code: '1'

- name: Generate SBOM for later re-scanning
  run: syft myapp:${{ github.sha }} -o spdx-json > sbom.json
Set the threshold where the team will actually keep it. A gate at MEDIUM produces so much noise it gets disabled within a fortnight, and a disabled gate protects nothing. Start at CRITICAL, add HIGH once the backlog is clear, and always pair it with --ignore-unfixed so you are not blocking on CVEs with no available patch.
Hardening the Pod: securityContext That Actually Restricts
Most manifests in the wild set nothing here, which means root, a writable filesystem and the full default capability set. This is the baseline worth copying:
securityContext:
  runAsNonRoot: true
  runAsUser: 10001
  allowPrivilegeEscalation: false
  readOnlyRootFilesystem: true
  capabilities:
    drop: ["ALL"]
  seccompProfile:
    type: RuntimeDefault
Each line removes a real escalation path. readOnlyRootFilesystem is the one teams push back on — the fix is an emptyDir mounted at /tmp, not turning the flag off.
Enforce it namespace-wide with Pod Security Standards
PodSecurityPolicy was removed in Kubernetes 1.25. Pod Security Admission replaced it and is enabled by default — it is applied with namespace labels:
apiVersion: v1
kind: Namespace
metadata:
  name: payments
  labels:
    pod-security.kubernetes.io/enforce: restricted
    pod-security.kubernetes.io/enforce-version: latest
    # audit/warn first so you see what would break before enforcing
    pod-security.kubernetes.io/warn: restricted
Roll out with warn before enforce. The restricted profile rejects a surprising share of real workloads on first contact.
Admission Control: Rejecting Bad Images Before They Run
Pod Security Admission covers the built-in profiles. Anything beyond that — "only images from our registry", "only signed images" — needs a policy engine. Kyverno is the lower-friction option because policies are plain YAML.
apiVersion: kyverno.io/v1
kind: ClusterPolicy
metadata:
  name: restrict-image-registries
spec:
  validationFailureAction: Enforce
  rules:
    - name: only-approved-registry
      match:
        any:
          - resources:
              kinds: ["Pod"]
      validate:
        message: "Images must come from registry.example.com"
        pattern:
          spec:
            containers:
              - image: "registry.example.com/*"
Verify signatures, not just registries
A registry allow-list stops the obvious cases. Signing proves the image is the artefact your pipeline actually produced:
# Sign at the end of the build
cosign sign --key cosign.key registry.example.com/myapp:1.4.2

# Verify manually
cosign verify --key cosign.pub registry.example.com/myapp:1.4.2
Then make the cluster refuse anything unsigned, so verification is not optional:
apiVersion: kyverno.io/v1
kind: ClusterPolicy
metadata:
  name: require-signed-images
spec:
  validationFailureAction: Enforce
  rules:
    - name: verify-signature
      match:
        any:
          - resources:
              kinds: ["Pod"]
      verifyImages:
        - imageReferences: ["registry.example.com/*"]
          attestors:
            - entries:
                - keys:
                    publicKeys: |-
                      -----BEGIN PUBLIC KEY-----
                      <your cosign public key>
                      -----END PUBLIC KEY-----
Default-Deny Networking
Kubernetes allows all pod-to-pod traffic by default. One compromised container therefore reaches everything in the cluster. The single highest-value policy is a namespace default-deny, then explicit allows:
apiVersion: networking.k8s.io/v1
kind: NetworkPolicy
metadata:
  name: default-deny-all
  namespace: payments
spec:
  podSelector: {}          # every pod in the namespace
  policyTypes: ["Ingress", "Egress"]
---
apiVersion: networking.k8s.io/v1
kind: NetworkPolicy
metadata:
  name: allow-api-to-db
  namespace: payments
spec:
  podSelector:
    matchLabels: {app: postgres}
  policyTypes: ["Ingress"]
  ingress:
    - from:
        - podSelector:
            matchLabels: {app: api}
      ports:
        - port: 5432
Check your CNI enforces them. NetworkPolicy objects are accepted by the API server whether or not the network plugin implements them — flannel, for instance, ignores them silently. Apply a default-deny and confirm traffic actually stops before assuming you are protected.
Mapping Controls to NIST SP 800-190
If you need to show an auditor that container security is covered rather than improvised, NIST SP 800-190 (Application Container Security Guide) is the reference they will recognise. It groups risk into five areas — this maps each to the control that answers it.
| NIST 800-190 risk area | Example risk | Control |
|---|---|---|
| Image | Vulnerabilities, embedded secrets, untrusted base images | Trivy/Grype gate in CI, SBOM, secret scanning, pinned digests |
| Registry | Stale images, weak authentication, plaintext transport | Private registry over TLS, cosign signing, retention policy |
| Orchestrator | Unbounded admin access, mixed workload sensitivity | RBAC least privilege, namespace isolation, admission policy |
| Container | Insecure runtime config, unbounded network access | securityContext above, NetworkPolicy default-deny |
| Host OS | Large attack surface, shared kernel | Minimal/immutable host OS, node patching, Falco monitoring |
The point of the mapping is not the document — it is that "we scan images" answers exactly one of five rows. Most breaches involve the other four.
Container Security FAQ
What is DevSecOps container security?
It is the practice of embedding container security controls into the delivery pipeline rather than auditing after deployment: image scanning gated in CI, signed images, admission policies that reject non-compliant workloads, and runtime monitoring — all owned by the delivery team rather than a separate review stage.
How do I scan container images for vulnerabilities?
Run a scanner in CI and let it fail the build. For example 'trivy image --severity HIGH,CRITICAL --ignore-unfixed --exit-code 1 myapp:1.4.2'. Also emit an SBOM with Syft so you can re-check already-shipped images against new CVEs without rebuilding.
What replaced PodSecurityPolicy in Kubernetes?
Pod Security Admission, enabled by default since Kubernetes 1.25. It is configured with namespace labels such as pod-security.kubernetes.io/enforce: restricted. Use the warn level first, because the restricted profile rejects a significant share of existing workloads.
What securityContext settings should every container have?
runAsNonRoot: true, allowPrivilegeEscalation: false, readOnlyRootFilesystem: true, capabilities drop ALL, and seccompProfile RuntimeDefault. Each closes a specific escalation path, and together they are the practical baseline.
Do I need image signing if I already scan images?
They answer different questions. Scanning asks whether the image contains known vulnerabilities; signing proves the image is the artefact your pipeline built and was not swapped in the registry. Enforce signatures with a Kyverno verifyImages rule so the check cannot be skipped.
What is NIST SP 800-190?
The NIST Application Container Security Guide. It groups container risk into five areas — image, registry, orchestrator, container and host OS — and is the framework most auditors recognise. Scanning images addresses only one of the five.
Conclusion: Let's Celebrate Secure Containers!
As we wrap up this adventure through the world of container security, remember that adopting DevSecOps best practices is not about relying on a single security tool. Container security is a chain that starts with your source code and dependencies and continues through image building, vulnerability scanning, software supply chain verification, Kubernetes admission policies, runtime security, and network controls.
Every stage plays a role. Your images need to be scanned and signed, your workloads need to run with the least privileges possible, your Kubernetes policies need to be enforced, and your running containers need to be monitored for unexpected behavior. If one part of this chain is ignored, the overall security of the environment becomes weaker.
The good news is that DevOps already gives us the perfect place to build these controls. Instead of treating security as a separate step at the end of the development process, we can automate security checks directly into the CI/CD pipeline, enforce policies when workloads enter the cluster, and continuously monitor them while they are running.
The goal isn't to build an environment with dozens of security tools that nobody knows how to maintain. The goal is to make secure behavior the default behavior. When scanning, signing, policy enforcement, least-privilege configuration, and runtime monitoring become normal parts of the deployment process, developers don't have to think about security as an additional hurdle every time they deploy.
That's where DevSecOps really starts to make a difference. 🔐🐳