100 Things You Didn't Know About Kubernetes - Part 2
Think you know Kubernetes? Discover more hidden features, kubectl tricks, and powerful insights that can take your Kubernetes and DevOps skills further.

Welcome back, intrepid explorers of the Kubernetes cosmos! If you've missed the exhilarating revelations from Part 1 of our blog series, we strongly recommend you catch up on the first installment 100 Things You Didn't Know About Kubernetes - Part 1 before diving into this continuation. Your journey into the intricate world of Kubernetes is about to be enriched with another set of 10 captivating facts that might reshape your perspective once again. So, let's embark on this enthralling expedition as we unveil more of Kubernetes' hidden gems!
11. Embracing Enhanced Security with Kata Containers 💡
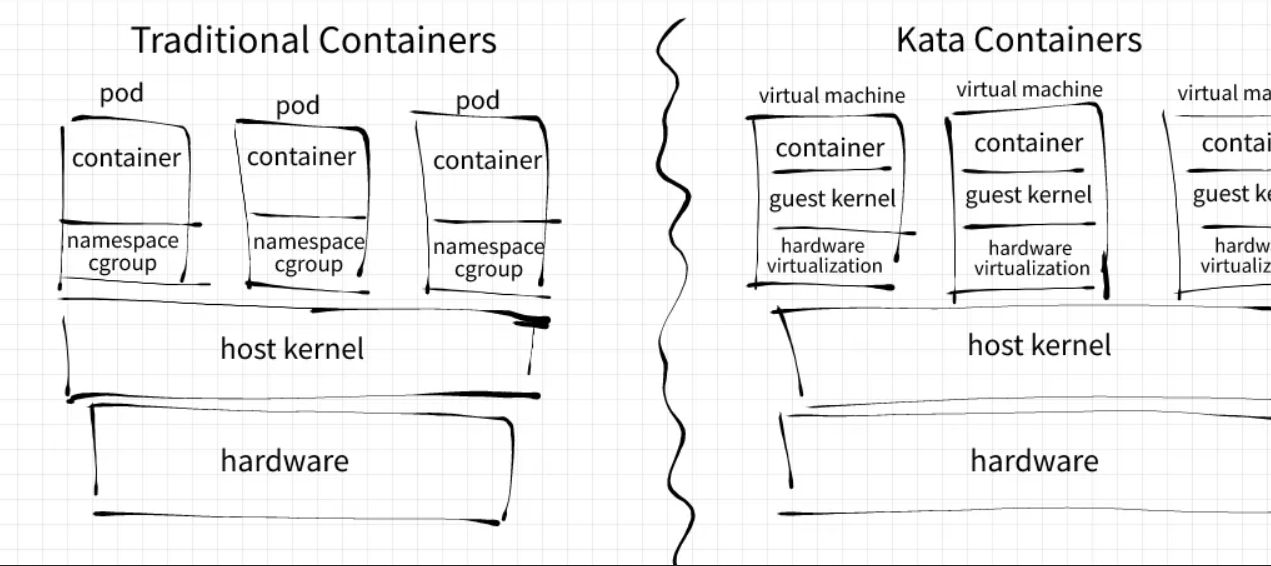
As Kubernetes enthusiasts, you're well aware of its remarkable security model, isolating pods in separate namespaces and cgroups. Yet, beneath this layer of protection lies a potential vulnerability – the shared underlying host kernel. Fear not, for the solution is Kata Containers!
By deploying pods with their individual lightweight kernels, Kata Containers offers unparalleled security. This approach ensures each pod's independence, reducing the attack surface and reinforcing your cluster's defenses.
Enhance your Kubernetes security with Kata Containers! Deploy pods with their own lightweight kernels for maximum isolation.
apiVersion: v1
kind: Pod
metadata:
  name: secure-pod
spec:
  runtimeClassName: kata
  containers:
    - name: main-container
      image: your-image
Embark on a journey to enhanced security at katacontainers.io.
12. ⚙️ Elevating Scheduler Intelligence with PodOverhead
Dive into the heart of Kubernetes scheduling with PodOverhead! Beyond the realms of memory, CPU, and storage, lies another vital resource – PodOverhead. This dynamic resource lets you fine-tune your cluster by providing additional hints to the scheduler. Especially useful for runtime classes like GPU instances, PodOverhead enhances the scheduler's decision-making.
Experience this intelligence firsthand:
apiVersion: node.k8s.io/v1
kind: RuntimeClass
metadata:
 name: runc
handler: runc
overhead:
 podFixed:
   memory: "120Mi"
   cpu: "250m"
Empower your scheduler to reach new heights of efficiency!
13. Unveiling Controlled Pod Evictions 🛑
Pod deletions are a delicate art in Kubernetes management. While evictions are usually reserved for overloaded nodes, here's a secret – you can manually trigger a pod eviction using the Kubernetes eviction API. Follow these steps:
- Craft an "eviction.json" file:
{
"apiVersion": "policy/v1",
"kind": "Eviction",
"metadata": {
"name": "pod-name-here",
"namespace": "default"
}
}
- Execute this command:
curl -v -H 'Content-type: application/json' \
  https://your-cluster-api-endpoint.example/api/v1/namespaces/default/pods/pod-name-here/eviction -d @eviction.json
Master the art of pod deletions with surgical precision!
14. Peeking into Kubernetes' Heartbeat: The Priority Level Queue 💓
Wouldn't you love to feel Kubernetes' heartbeat? Enter the Priority Level queue – your window into the server's activity. Experience it firsthand:
kubectl get --raw /debug/api_priority_and_fairness/dump_priority_levels
Uncover the rhythm that keeps your cluster alive and thriving!
15. Mastering Request Handling with FlowSchemas 🚀
Welcome to the art of request orchestration in Kubernetes! FlowSchemas offer you the power to sculpt the Kubernetes API server's behavior. Prioritize users, mark high-priority requests – the possibilities are boundless. Immerse yourself in this world of control:
apiVersion: flowcontrol.apiserver.k8s.io/v1beta1
kind: FlowSchema
metadata:
  name: high-priority
spec:
  priorityLevelConfiguration:
    name: high-priority
  rules:
  - from:
    - source:
        namespaces: ["important"]
    priorityLevel: "High"
Shape your Kubernetes cluster's responses with artistry!
16. Dynamic Resource Allocation: Expanding Possibilities Beyond the Cluster 🌌
In a universe where resource allocation knows no bounds, Kubernetes introduces Dynamic Resource Allocation. Extend your reach beyond the cluster, allocating custom resources to containers outside. Embrace the future with ResourceClass and ResourceClaim:
ResourceClass definition:
apiVersion: scheduling.k8s.io/v1
kind: ResourceClass
metadata:
  name: gpu-class
schedulerName: k8s.io/scheduler
ResourceClaim example:
apiVersion: scheduling.k8s.io/v1
kind: ResourceClaim
metadata:
  name: gpu-claim
spec:
  resourceClassName: gpu-class
Witness the birth of a new era in resource allocation!
17. 🛡️Enforcing Rules with ValidatingAdmissionWebhooks and MutatingAdmissionWebhooks
Kubernetes administration is about maintaining order amidst complexity. Enter ValidatingAdmissionWebhooks and MutatingAdmissionWebhooks – your tools for intercepting and validating requests. The path may require coding, but with templates, it's a breeze.
Dive into this realm of enforcement:
Example: github.com/slackhq/simple-kubernetes-webhook
Uphold rules and usher in a new era of Kubernetes governance!
18. Automating Namespace Provisioning with NamespaceAutoProvision 🏞️
For those weary of the manual namespace provisioning journey, relief has arrived! Meet NamespaceAutoProvision Admission Controller, here to automate the namespace creation process.
Say goodbye to the tedium:
Enable NamespaceAutoProvision for automatic namespace magic at kubernetes.io.
Here's an example YAML configuration for enabling NamespaceAutoProvision using an Admission Controller in Kubernetes:
apiVersion: v1
kind: ConfigMap
metadata:
  name: namespace-autoprovision-controller
  namespace: kube-system
data:
  config.yaml: |
    apiVersion: admissionregistration.k8s.io/v1
    kind: AdmissionConfiguration
    plugins:
    - name: NamespaceLifecycle
      configuration:
        namespaceAutoProvisioning: true
In this example:
- We create a
ConfigMapnamednamespace-autoprovision-controllerin thekube-systemnamespace to hold the configuration for the Admission Controller. - Inside the
ConfigMap, we define theconfig.yamlfile containing the configuration for the Admission Controller. - The
AdmissionConfigurationspecifies the plugins to be used. In this case, we're using theNamespaceLifecycleplugin and configuring it to enablenamespaceAutoProvisioning. - Apply the yaml file.
19. 🌐 Extending the Kubernetes API with Kubernetes API Aggregator Layer
Extending the Kubernetes API using the Aggregator Layer is a powerful concept that allows you to introduce subresources to native object kinds and aggregate them. This provides a way to extend the Kubernetes API itself with new functionality.
Here's a simple example to help illustrate the concept:
Let's say you want to add a new subresource to the native Pod object kind. This subresource could represent custom metrics associated with the pod. To achieve this, you would follow these steps:
Create the Aggregated API Server (Aggregator Layer):
This is the API server that serves as an intermediary between your custom API and the Kubernetes API. It listens on a different port and delegates requests to the appropriate API servers.
Here's a simplified example of what the configuration might look like (aggregator-config.yaml):
kind: APIService
apiVersion: apiregistration.k8s.io/v1
metadata:
  name: custom.metrics.example.com
spec:
  service:
    name: custom-metrics-service
    namespace: default
    port: 443
  group: custom.metrics.example.com
  version: v1alpha1
  insecureSkipTLSVerify: true
  groupPriorityMinimum: 100
  versionPriority: 100
Apply this configuration using:
kubectl apply -f aggregator-config.yaml
Create the Custom API:
Define your custom API and subresource. In this case, you'd define the PodMetrics resource as a subresource of the Pod object kind.
Here's a simplified example (pod-metrics-api.yaml):
apiVersion: apiextensions.k8s.io/v1
kind: CustomResourceDefinition
metadata:
  name: podmetrics.custom.metrics.example.com
spec:
  group: custom.metrics.example.com
  version: v1alpha1
  scope: Namespaced
  names:
    plural: podmetrics
    singular: podmetric
    kind: PodMetric
Apply this configuration using:
kubectl apply -f pod-metrics-api.yaml
Use the Custom API:
Once the Aggregator Layer and Custom API are set up, you can create instances of the new PodMetrics resource and interact with the subresource via the Aggregator API.
For more comprehensive information, you can refer to the official Kubernetes documentation on the Aggregator Layer:
Please note that setting up the Aggregator Layer and creating custom APIs can be a complex process with security and scalability considerations. It's recommended to thoroughly understand the implications and follow best practices.
20. The Codename "7" and Kubernetes' Star Trek Connection 🛸
Here's a nugget of Kubernetes history – its secret codename during inception was Project 7, a subtle nod to the Star Trek character Seven of Nine.
The Borg origins are hard to hide!
Delve into this fascinating slice of Kubernetes history: en.wikipedia.org/wiki/Kubernetes#History.
Resistance is futile – assimilate the knowledge!
Stay tuned, fellow adventurers, as we unravel more hidden treasures in the captivating world of Kubernetes. This voyage is far from over – there's always more to discover in the intricate tapestry of Kubernetes' secrets! 🌌🕵️♀️